Strawberry Jam Nails
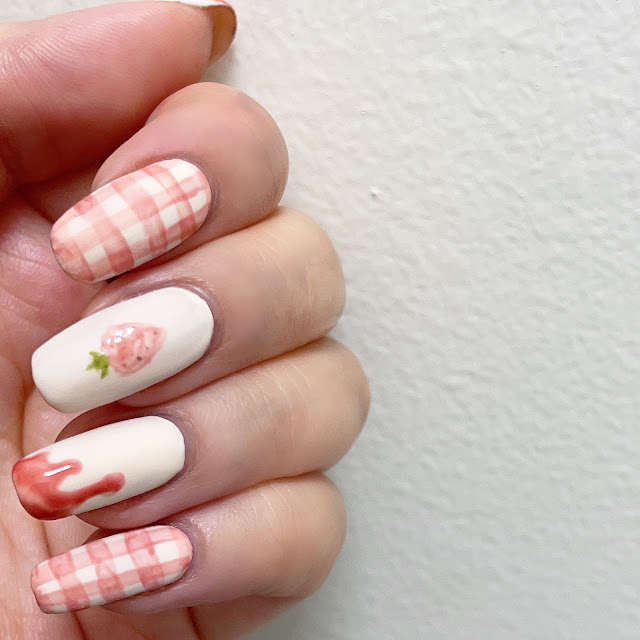
This design was almost entirely taken from Irotoiro's beautiful design with the omission of the strawberry jam toast. I ended up shuffling the designs and doing two plaids and two jam nails, with the accent nail on the middle finger with the strawberry (which is actually rare for me as I typically prefer the ring finger as the accent nail!) As always - Irotoiro's designs are by far my go to inspirational pics and all credit goes to them, but I thought it would be super cool to do a breakdown of the design.
There are a few key points in this design which I really liked - the translucent jammy texture of the gel color, and the use of textures on the design, the jam is finished with a shiny top coat to mimic actual jam, and the use of matte colors on the rest really emphasizes that jammy aspect. I also really love the soft pastel (as always), but the color theme is very consistent and very warm - and I love matching colors and I love strawberries.
Products used:
Ageha easy off base and matte top coat and Kokoist ultra glossy non wipe top coat gel
Colors: Ageha 109, 144 and 505 leafgel 002, 551, 611 Kokoist milk chocolate concealer
Mixing colors:
As always, I did a fair amount of mixing to get my colors. For the base 'cream' color, I mixed 109 and Milk Chocolate concealer with 002. 002 is a white base, and 109 is a cool, grey toned sheer beige and Milk Chocolate is more of a warm sheer ochre. I would say you'll need 50:25:25 as the ratio - but definitely eyeball it. I started off using far too much 002, which was too much of a stark white, and mixing a good ‘cream’ shade is really far warmer and darker than I had anticipated it to be! Due to the sheerness of both mixing colors, I ended up with minimal streakiness and patchiness on my right hand - I amended this on my left hand by first doing a thin base of white and going over with the cream shade.
For the strawberry/pink shade, I actually only had to mix one color for the whole design. I used 551 as a base color which is a sheer muted coral red, and mixed in a dab of 611 to add a ruby red tinge to darken it up, and used Milk Chocolate Concealer as a way to meld the colors together for a more harmonious look. The initial jammy color I mixed was far too dark and red as well - but it’s a bit more brown and warm than I anticipated as well. I used about a 60% base of 551, and 36% of Milk Chocolate and 4% 611 (you really don’t need much! Just a dab will do!). Due to the sheerness of the color, it’s easy to build up where you want and achieve the desired effect of both the gingham and the jam. The original design has a slightly darker brown tinge to the jam - but I think the muted coral pink is a nice shade too.
Design elements:
For the plaid:
it’s quite easy! Just get a thin brush and keep your hand as steady as possible and go in one direction first. Clean up any lines with a clean brush - and make sure you’ve got just the bare amount to go over your design. I’d say less is more as piling on more product often leads to pooling and uneven lines. Cure, and do the other direction - the sheerness of the gel will layer itself for you to look like the perfect gingham. Mine were a little wonky and I wasn’t totally happy with them, but I’m going to say it’s charming. Also relatively easy to do with your non dominant hand!
Jam drip:
Another design which is very easy to do with a non dominant hand! Sometimes trying to get the best artful drip shape can be difficult, but make sure it pools right around the bottom of the drip, and the rest will usually follow. The patchiness of the sheer color on this can be concentrated or darkened around key points to create definition and dimension.
Strawberry:
Again, the same color. The strawberry on my left hand is actually slightly more pastel than I’d like, as I had to wipe it due to not liking my original seeds. If I could add to it, I think I’d add a smidge more color to it. This was done by doing a sort of ‘heart’ shape and padding out the top. The seeds were done with the 144, and the stems were done with 505 - both translucent/sheer colors to keep the colors muted. I opted for a lighter, less noticeable dot for the seeds as I didn’t like the way the darker ones looked on me. The stem was done with a small detail brush with 3 little leaves (a bit smaller than the original to match the smaller strawberry) and the simplicity of the design makes it easy to do on both hands.
Finishing off:
Apply a matte top coat on all your fingers. After curing, using a small detail brush, get some glossy top coat and dab carefully on the strawberry and the jam drips to mimic the jammy shine.
For a first try - I’m super happy with this! There are definitely small little mistakes I made on this which I would improve on for next time (which the perfectionist in me just keeps on looking at), and perhaps it’s not the best idea to do a whole manicure with shaky arms, but I think they’re just so cute and couldn’t resist doing them.
I've saved my right hand shots till last - though I'm pretty happy with how it turned out!


Comments
Post a Comment